
Integration testing for dotnet core APIs: Handling APIs behind authentication

Integration testing for APIs behind authentication
This is continuation of the Integration testing in dotnet series.
This time we will be covering on how to test APIs which are behind authentication. We will be extending the same code repo we used in the previous article on handling 3rd party services (folder name DemoWith3rdPartyService).
Please make sure to checkout the previous articles in the series to get the most out of this article:
Integration testing for dotnet core APIs: Introduction
This is going to be a multi-part series on integration tests from introduction to advanced use cases.
devcodex.in
Integration testing for dotnet core APIs: Handling database
Welcome to the 2nd post in our Integration testing series. You may check out the previous post that introduces integration testing.
devcodex.in
Integration testing for dotnet core APIs: Handling 3rd party service calls using wiremock
This is continuation of the Integration testing in dotnet series. This time we will be covering the scenario where APIs interact with 3rd party services.
devcodex.in
Let’s get started
To make this happen we have created an authenticated version of our SuperHero API. The API is called /SuperHero/private. Refer the swagger screenshot below.

Our API action method in code will look like below. Notice the [Authorize] attribute with role required as Admin
            [HttpGet("private")]
            [Authorize(Roles = "Admin")]
            public async Task<IEnumerable<SuperHero>> GetPrivate()
            {
                return await superHeroRepository.GetAllSuperHeroes();
            }
Code Sample #2 : Authenticated API action methodWe have done some wiring to setup JWT based authentication scheme in our SuperHero API project. However, please note that, with little tweaks in the test setup, this should work for all kinds of authentication schemes.
For a quick reference, here is the authentication setup. The auth settings are being read from appsettings.
            builder.Services.AddAuthentication(options =>
            {
                options.DefaultChallengeScheme = JwtBearerDefaults.AuthenticationScheme;
                options.DefaultScheme = JwtBearerDefaults.AuthenticationScheme;
            })
            .AddJwtBearer(JwtBearerDefaults.AuthenticationScheme, options =>
            {
                IdentityModelEventSource.ShowPII = true;
                options.SaveToken = true;
                options.IncludeErrorDetails = true;
                var authSettings = builder.Configuration.GetSection("JwtBearerSettings")
                    .Get<JwtBearerSettings>();

                options.TokenValidationParameters = new TokenValidationParameters()
                {
                    ValidAudience = authSettings!.Audience,
                    ValidIssuer = authSettings.Issuer,
                    ValidateIssuer = true,
                    ValidateAudience = true,
                    ValidateIssuerSigningKey = true,
                    IssuerSigningKey = new SymmetricSecurityKey(Encoding.UTF8.GetBytes(authSettings.SigningKey))
                };
            });
Code Sample #3 : Authentication setupAfter all that setup, when we try to access this API without token then we get 401 error as expected

Now that we understand the authentication setup, we can quickly head to https://jwt.io to generate a token by specifying the claims and signing key. Notice we have also setup the role as admin in the token. This is just to verify that the API functions correctly. We will cover how can we generate this token for integration tests later.
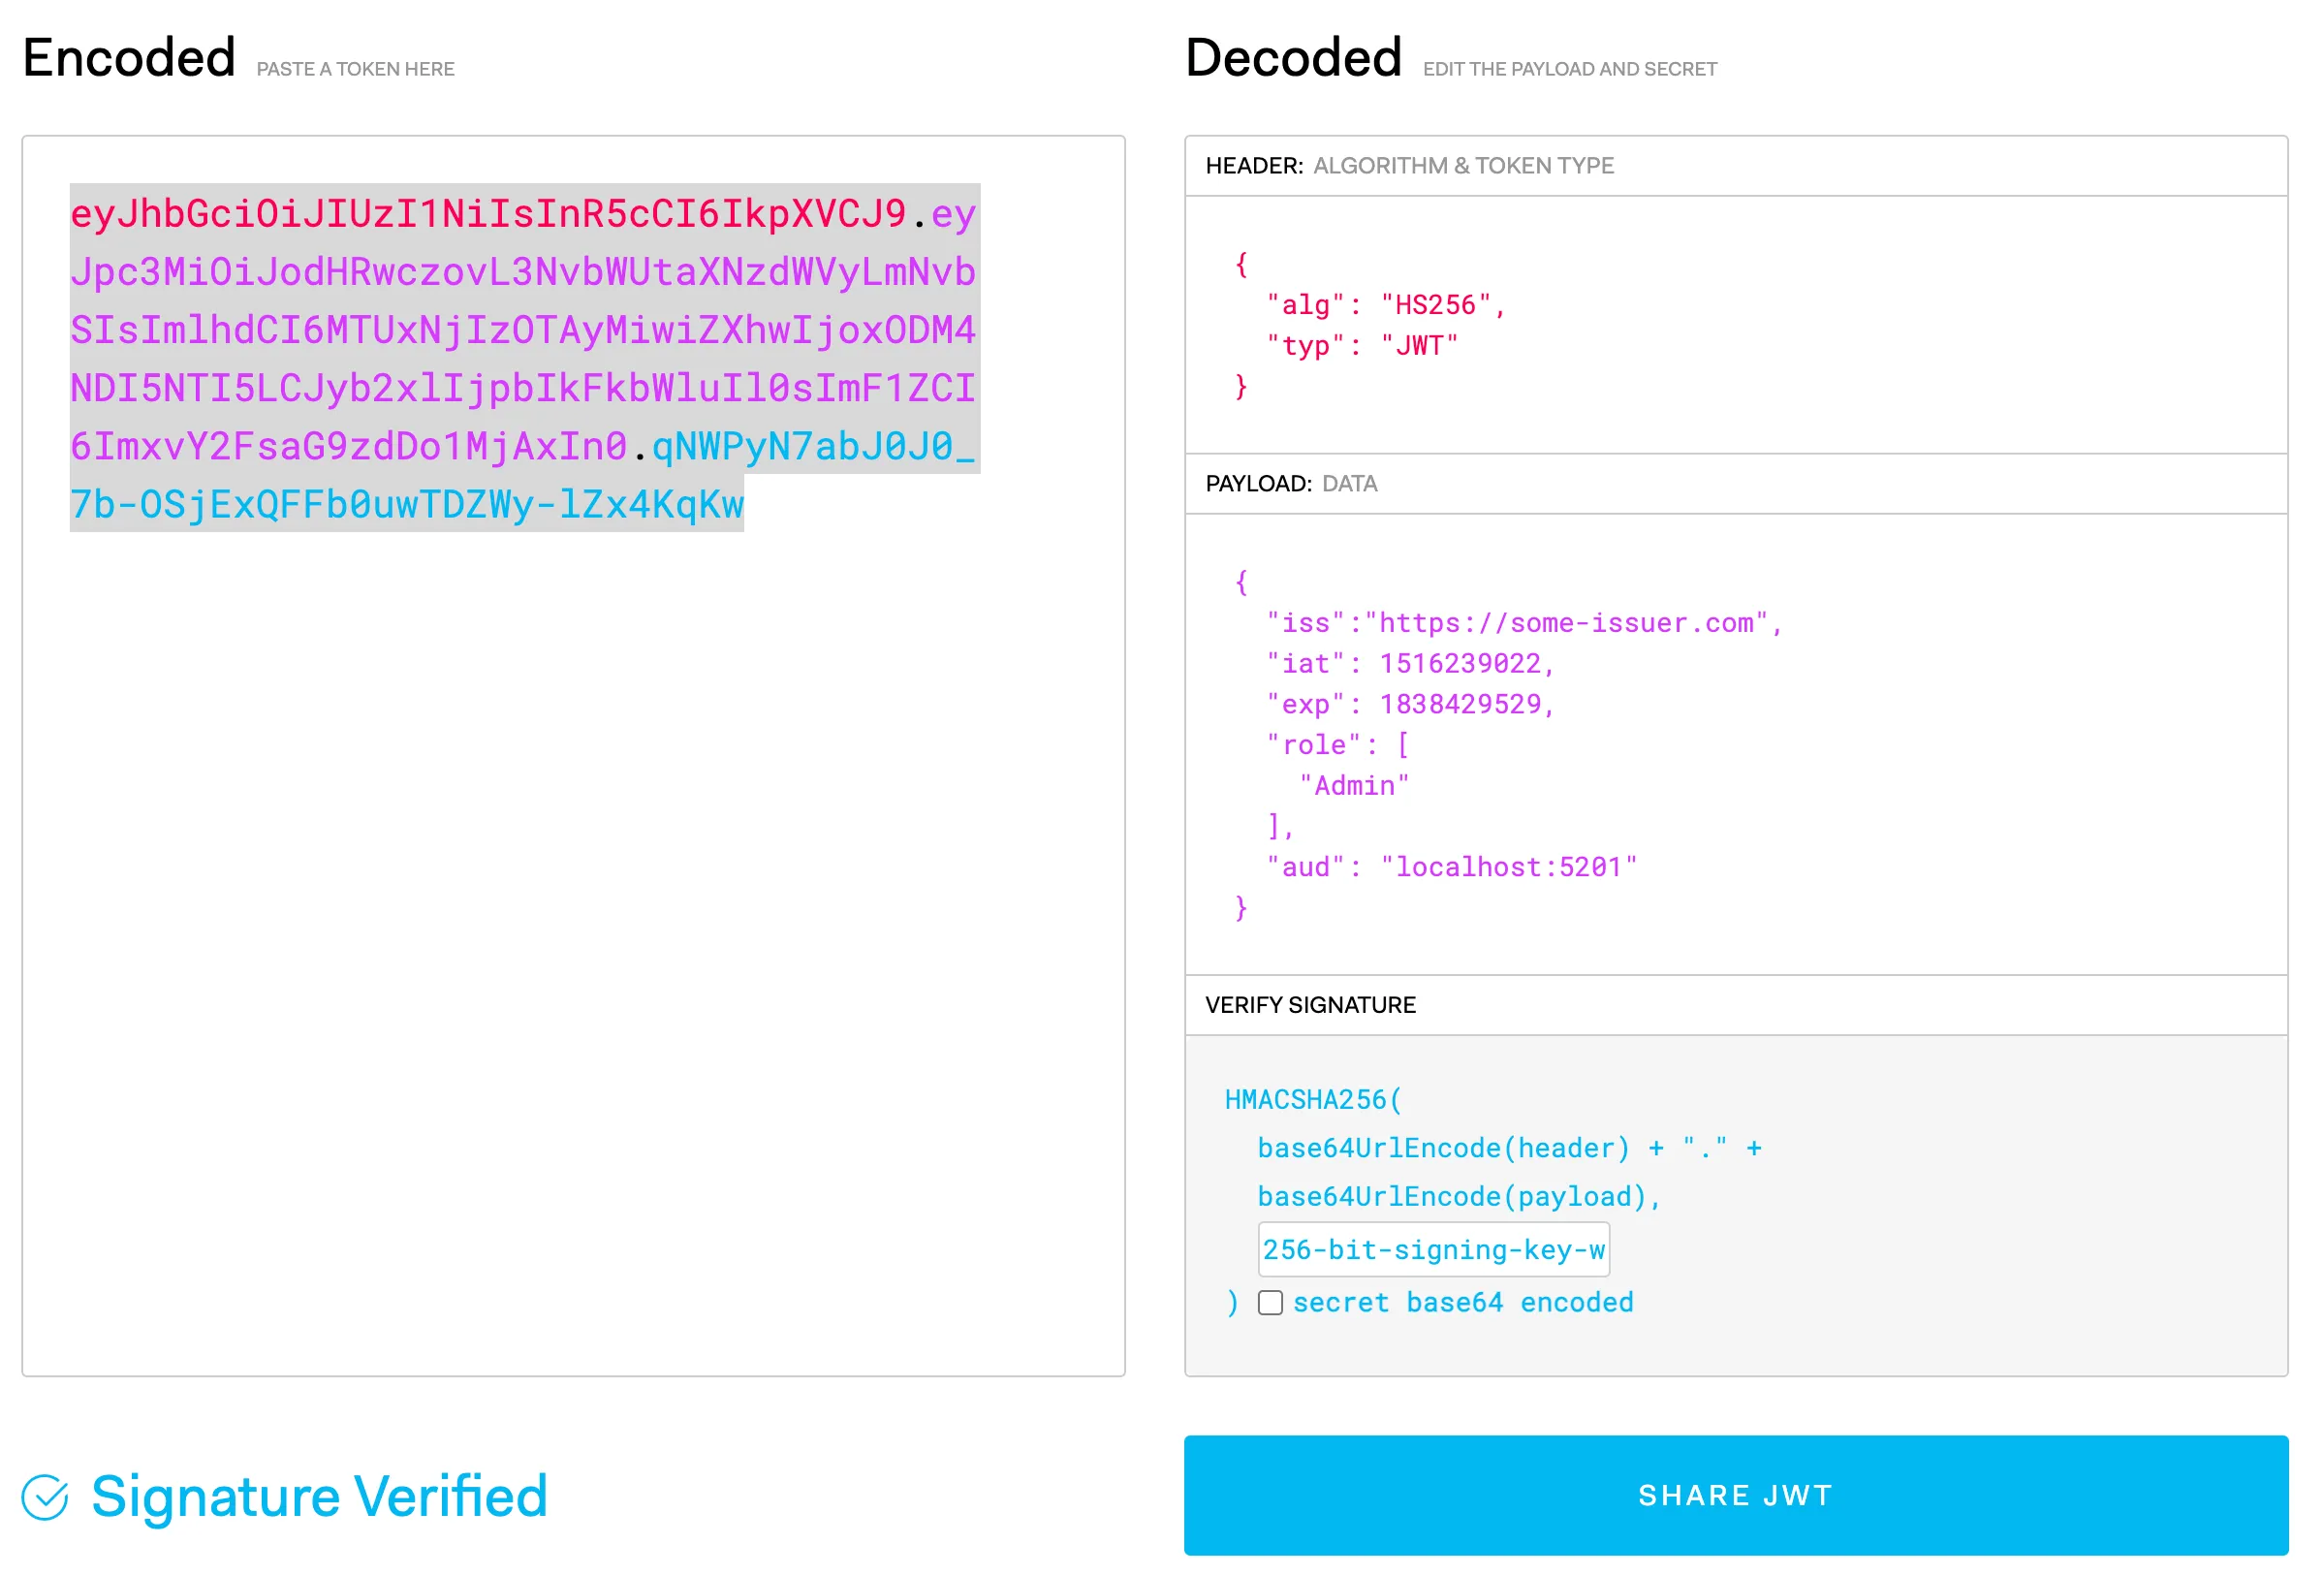
Now once we get hold of the token, we can set the token in swagger.
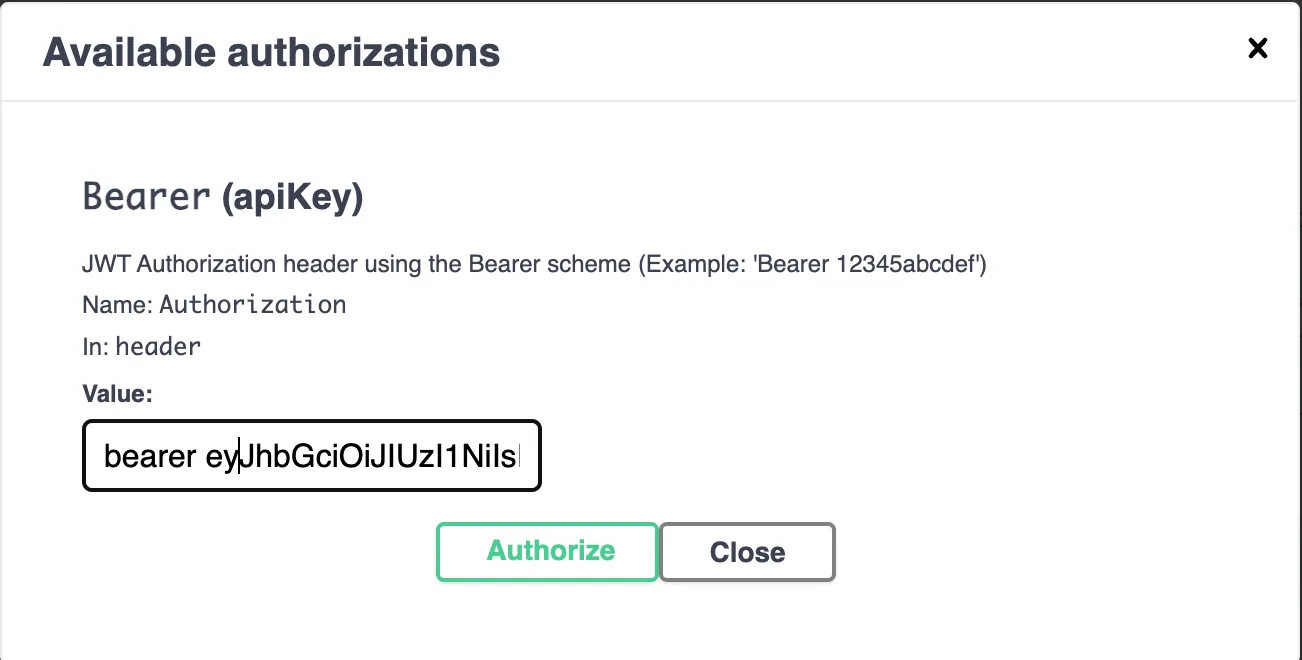
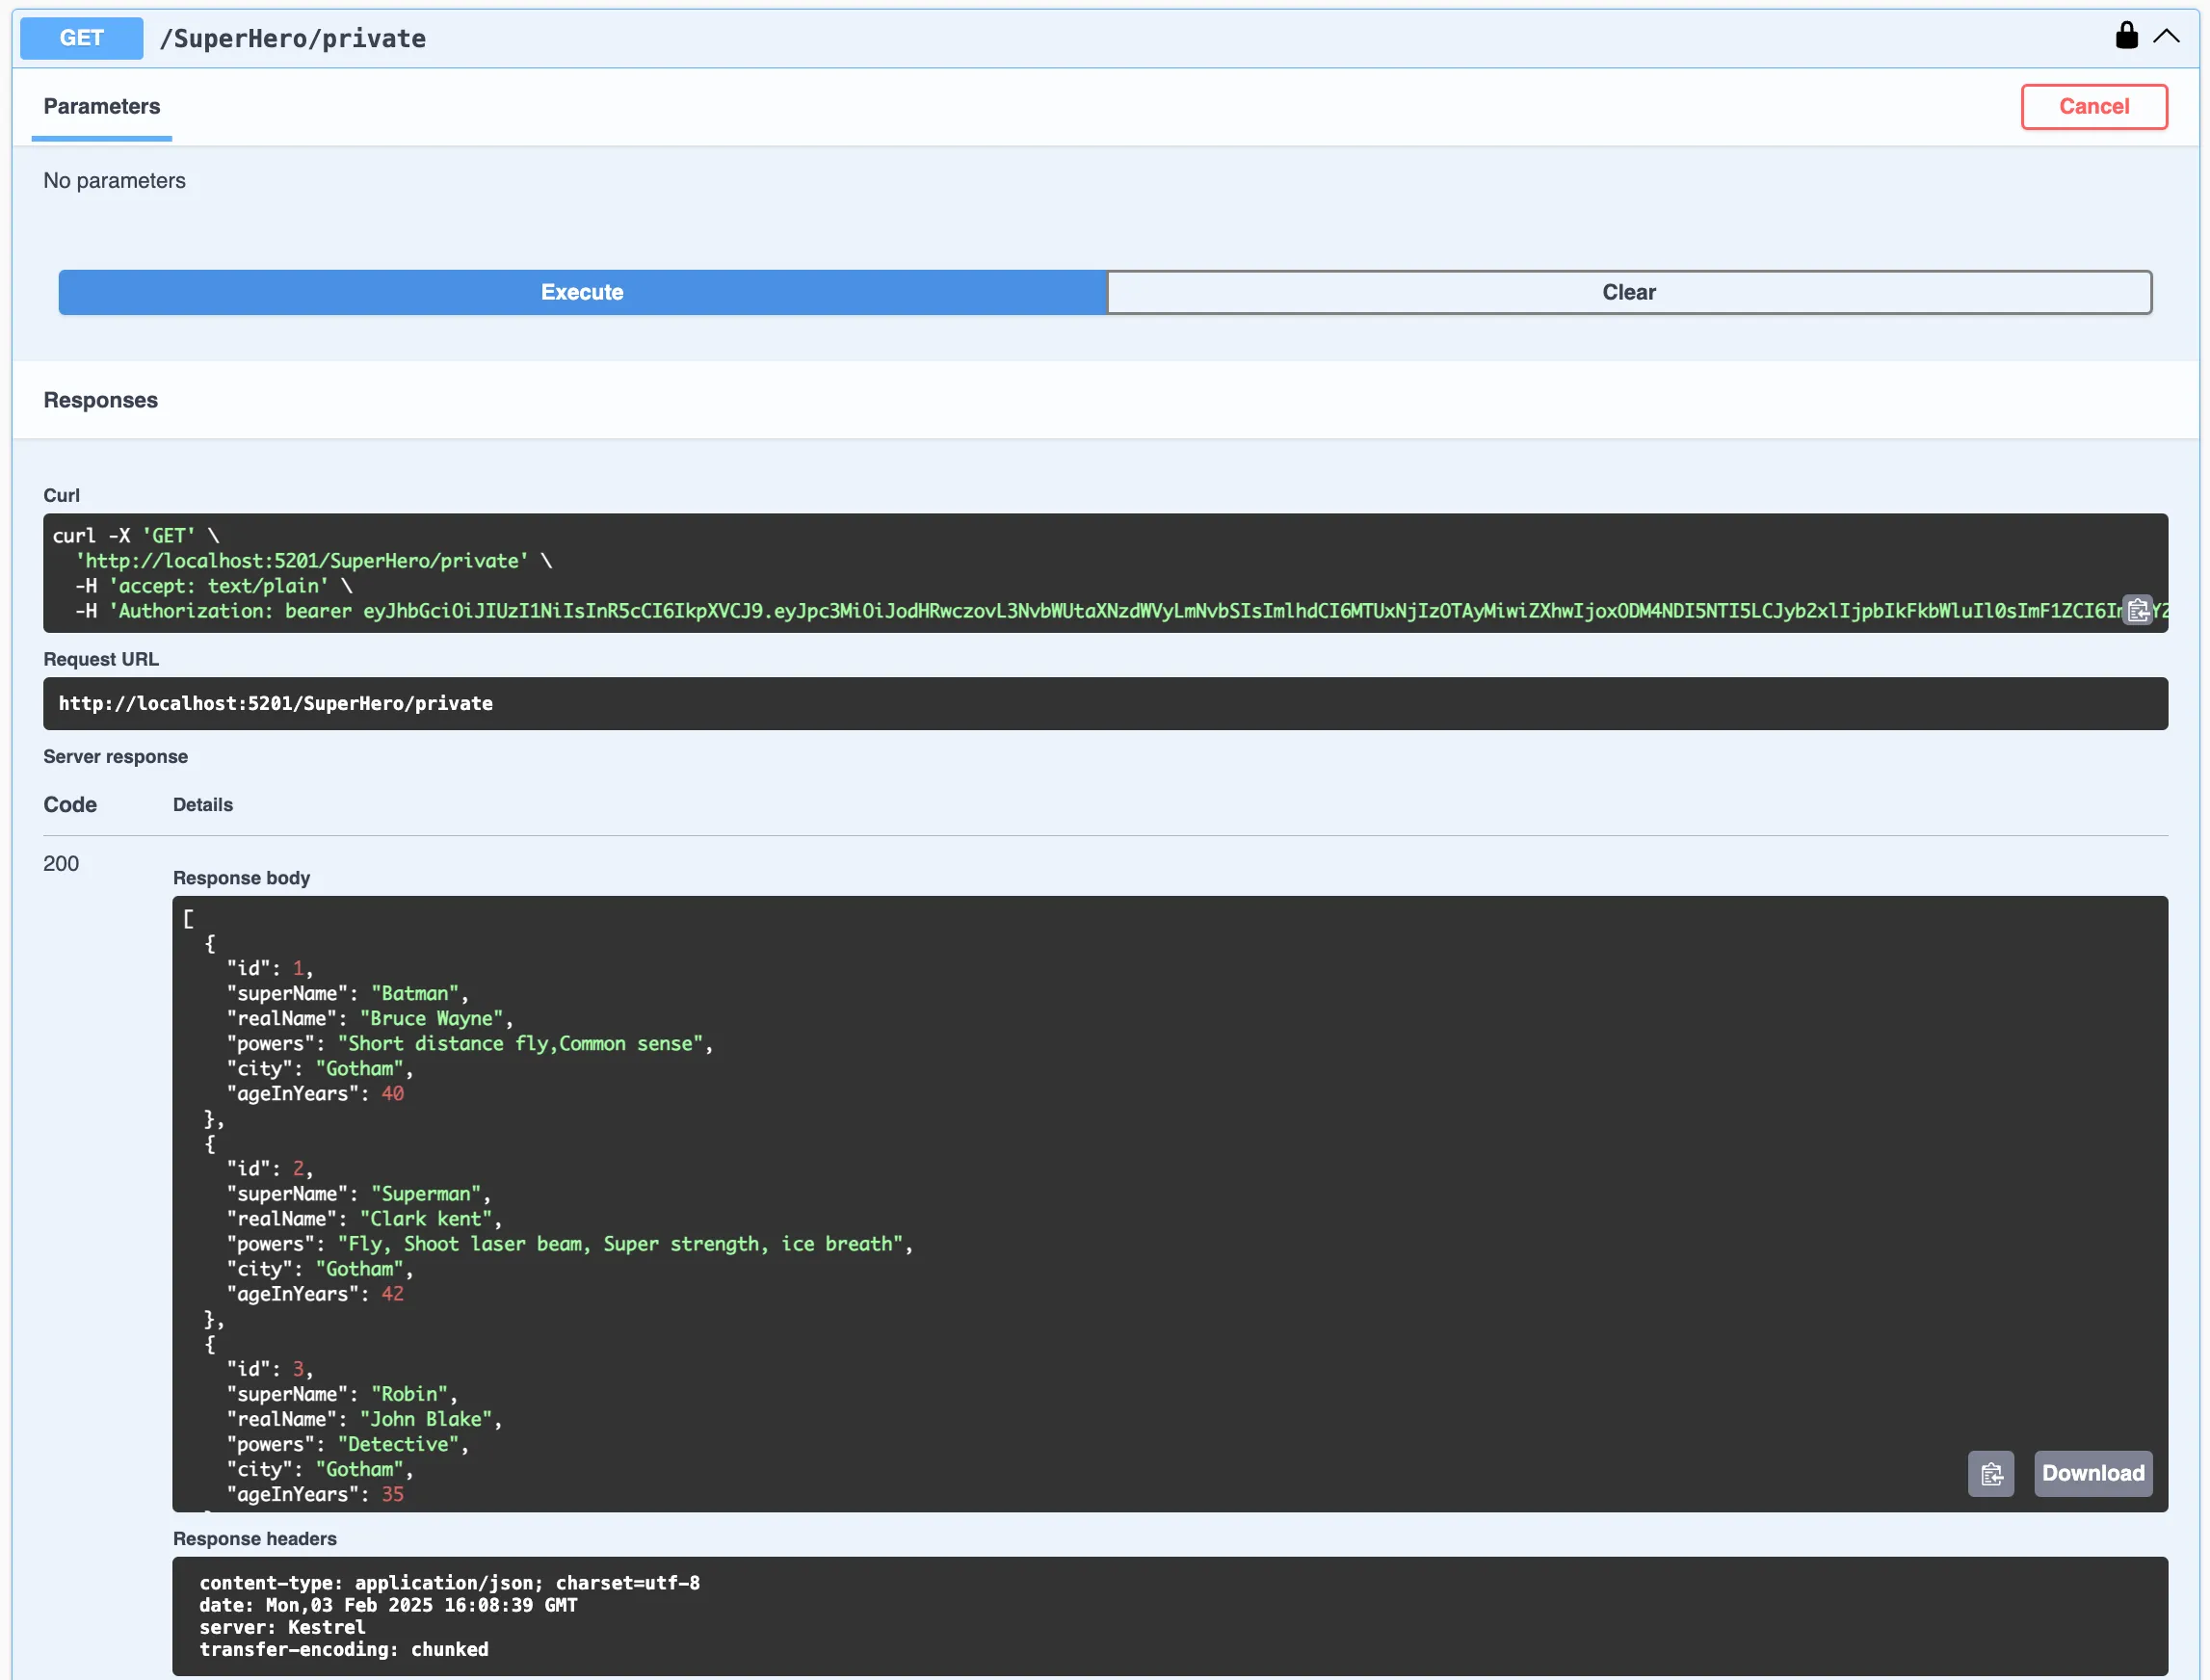
Once the token is configured, we should expect 200 success with response data like below.
Now that we have seen our authenticated API working, we can proceed to write the integration tests for it.
The setup
Now this is going to be a bit complex setup, however, it will help us in testing different and complex scenarios. The following steps are needed before we begin writing tests.
Step 1: A class to help us create authentication claims
Why is this needed?
We need this to create HTTP client with different set of authentication claims for different kinds of auth flows. For example, an API might work only for Admin role and another may work for some other role having fewer privileges. Our AuthClaimsProvider looks like below:
                public class AuthClaimsProvider
                {
                    public IList<Claim> Claims { get; } = new List<Claim>();

                    public static AuthClaimsProvider WithAdminClaim()
                    {
                        var provider = new AuthClaimsProvider();
                        provider.Claims.Add(new Claim(ClaimTypes.Role, "Admin"));

                        return provider;
                    }

                    public static AuthClaimsProvider WithAnonymousClaim()
                    {
                        var provider = new AuthClaimsProvider();
                        provider.Claims.Add(new Claim(ClaimTypes.Role, "Anonymous"));

                        return provider;
                    }
                }
Code Sample #4 : AuthClaimsProvider classStep 2: An extension method to create HTTP client with required auth claims
Why is this needed?
It's needed because when we create a default HTTP client for tests using CustomApiFactory, the created HTTP client instance does not hold any auth token. However, for our authenticated APIs, we want our HTTP client to have the required token.
                public static HttpClient CreateClientWithClaim(this CustomApiFactory factory, AuthClaimsProvider claims)
                {
                    var client = factory.WithWebHostBuilder(builder =>
                        {
                            builder.ConfigureTestServices(services =>
                            {
                                // Removing existing instance of AuthClaimsProvider to register with instance received as param
                                var descriptor = services.SingleOrDefault(d => d.ServiceType == typeof(AuthClaimsProvider));

                                if (descriptor != null)
                                {
                                    services.Remove(descriptor);
                                    services.AddScoped(_ => claims);
                                }
                            });
                        })
                        .CreateClient();

                    return client;
                }
Code Sample #5 : Extension method for HTTP clientStep 3: Setting up a service to introduce the authentication ticket/token in the request
Why is this needed?
It's needed because in real scenarios, users will get tokens by performing any auth process, like:
- By providing username and password
- By using third-party auth services like Google, Facebook, LinkedIn, etc.
- By using ClientId and Secret to obtain a token via client credentials flow
Since our integration tests should not require any user intervention, we will be introducing a TestAuthHandler so that whenever we try to create an HTTP client to call our service, we should get a client with the authentication token as per our test setup.
                public class TestAuthHandler(
                    IOptionsMonitor<AuthenticationSchemeOptions> options,
                    ILoggerFactory logger,
                    UrlEncoder encoder,
                    AuthClaimsProvider claimsProvider)
                    : AuthenticationHandler<AuthenticationSchemeOptions>(options, logger, encoder)
                {
                    public const string SchemeName = "Test";

                    // These claims will be set by the extension method `CreateClientWithClaim` used to create HTTP client in tests
                    private readonly IList<Claim> _claims = claimsProvider.Claims;

                    protected override Task<AuthenticateResult> HandleAuthenticateAsync()
                    {
                        // Sometimes we do not want to have our HTTP client to hold a token.
                        // This line will make sure the default HTTP client created from CustomApiFactory is not with auth ticket
                        if (_claims == null || !_claims.Any())
                        {
                            return Task.FromResult(AuthenticateResult.NoResult());
                        }

                        var identity = new ClaimsIdentity(_claims, SchemeName);
                        var principal = new ClaimsPrincipal(identity);
                        var ticket = new AuthenticationTicket(principal, SchemeName);

                        return Task.FromResult(AuthenticateResult.Success(ticket));
                    }
                }
Code Sample #6 : TestAuthHandler classStep 4: Registering the TestAuthHandler service
Why is this needed?
It's needed so that whenever we try to get an HTTP client from the CustomApiFactory, we get an HTTP client with an auth token in it (unless we do not want it by using empty claims).
                builder.ConfigureTestServices(services =>
                {
                    services.AddAuthentication(TestAuthHandler.SchemeName)
                        .AddScheme<AuthenticationSchemeOptions, TestAuthHandler>(TestAuthHandler.SchemeName, _ => { });

                    services.AddScoped(_ => new AuthClaimsProvider());
                });
Code Sample #7 : Registering TestAuthHandlerFinally, the tests
Let's add a test to our SuperHeroApiTests. Please note that the below test is with the default HTTP client, which does not hold any successful auth ticket:
            [Fact(DisplayName = "Get all superheroes authenticated API returns all superheroes")]
            public async Task Get_All_SuperHeroes_Authenticated_Returns_List_Of_SuperHero()
            {
                // Arrange
                factory.SharedFixture.SuperHeroDbContext.SuperHero.AddRange(new List<SuperHeroApiWith3rdPartyService.Data.Models.SuperHero>()
                {
                    new(11, "Batman","Bruce Wayne","Short distance fly,Common sense","Gotham", 40),
                    new(22, "Superman", "Clark kent", "Fly, Shoot laser beam, Super strength, ice breath","Gotham", 42),
                    new(33, "Robin", "John Blake", "Detective","Gotham", 35)
                });
                await factory.SharedFixture.SuperHeroDbContext.SaveChangesAsync();

                // Act
                using var httpClient = factory.CreateClient(); // Default HTTP client
                var response = await httpClient.GetAsync("/SuperHero/private");

                // Assert
                response.StatusCode.Should().Be(HttpStatusCode.OK);
                var superHeroes = await response.Content.ReadFromJsonAsync>List>SuperHeroApiWith3rdPartyService.Data.Models.SuperHero>>();
                superHeroes.Should().NotBeEmpty();
                superHeroes.Should().Contain(s => s.SuperName == "Batman");
            }
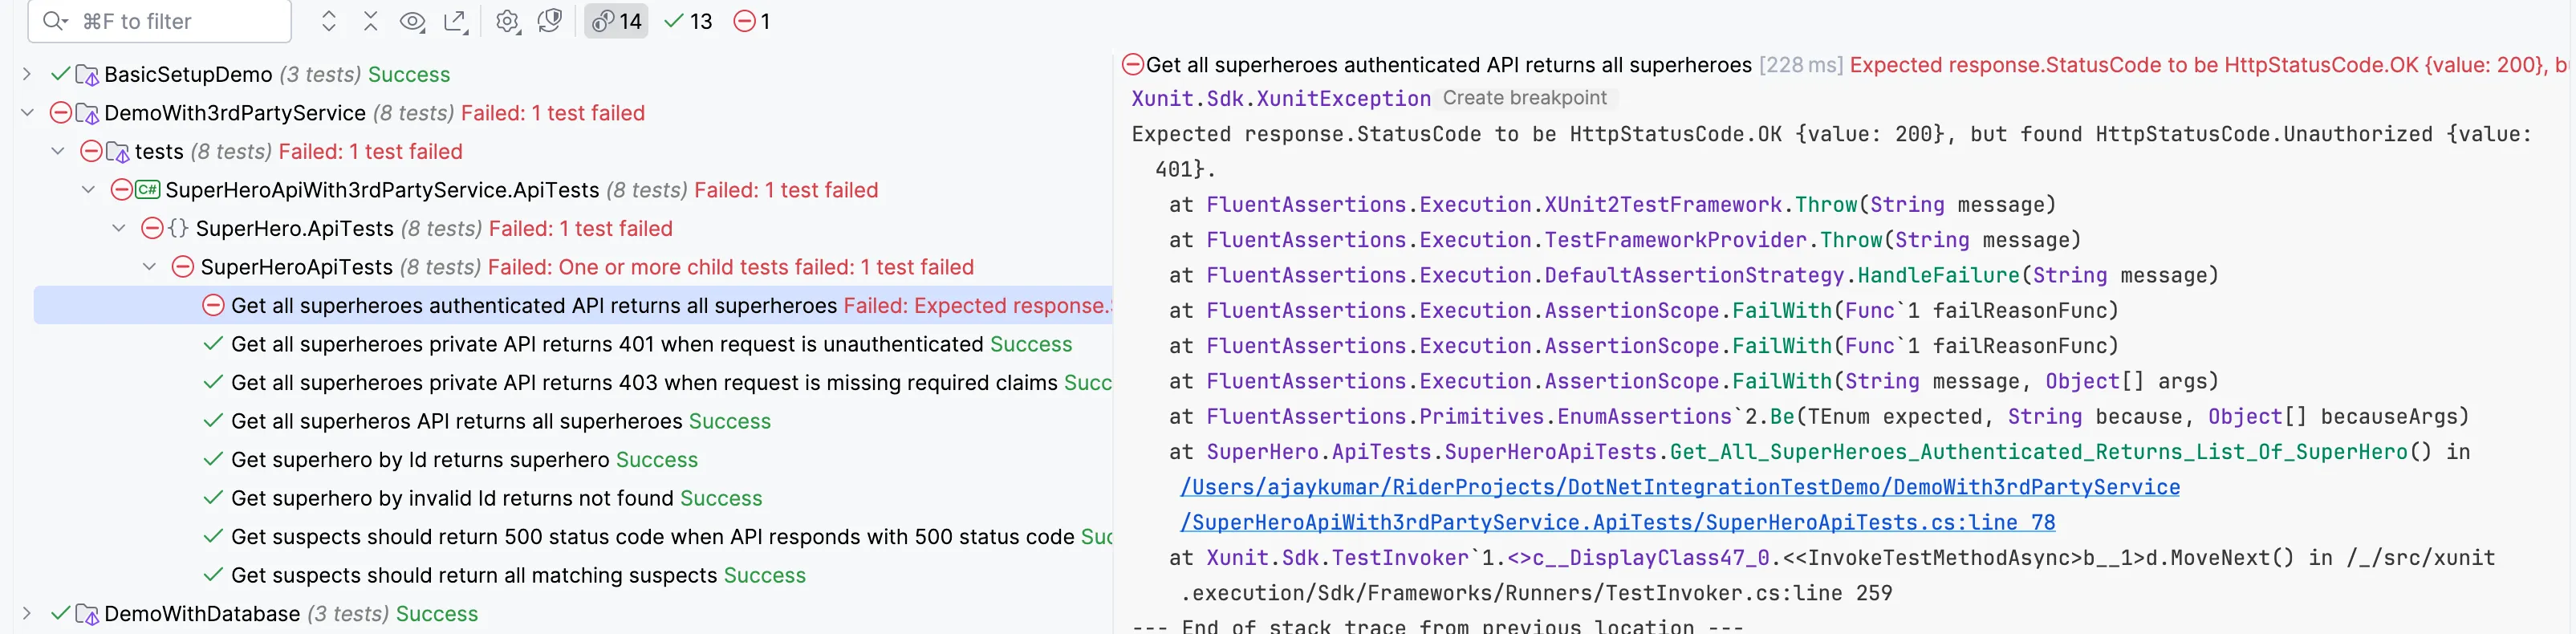
Code Sample #8 : Test with default HTTP clientUpon running this, we get a result like below: 401, since the auth token is not there.
Let's change the code to create the HTTP client with some claims this time:
            // Replace
            using var httpClient = factory.CreateClient();

            // With
            using var httpClient = factory.CreateClientWithClaim(AuthClaimsProvider.WithAnonymousClaim());
Code Sample #9 : Test with anonymous claimsNow our API is using the token. Let's run the tests.
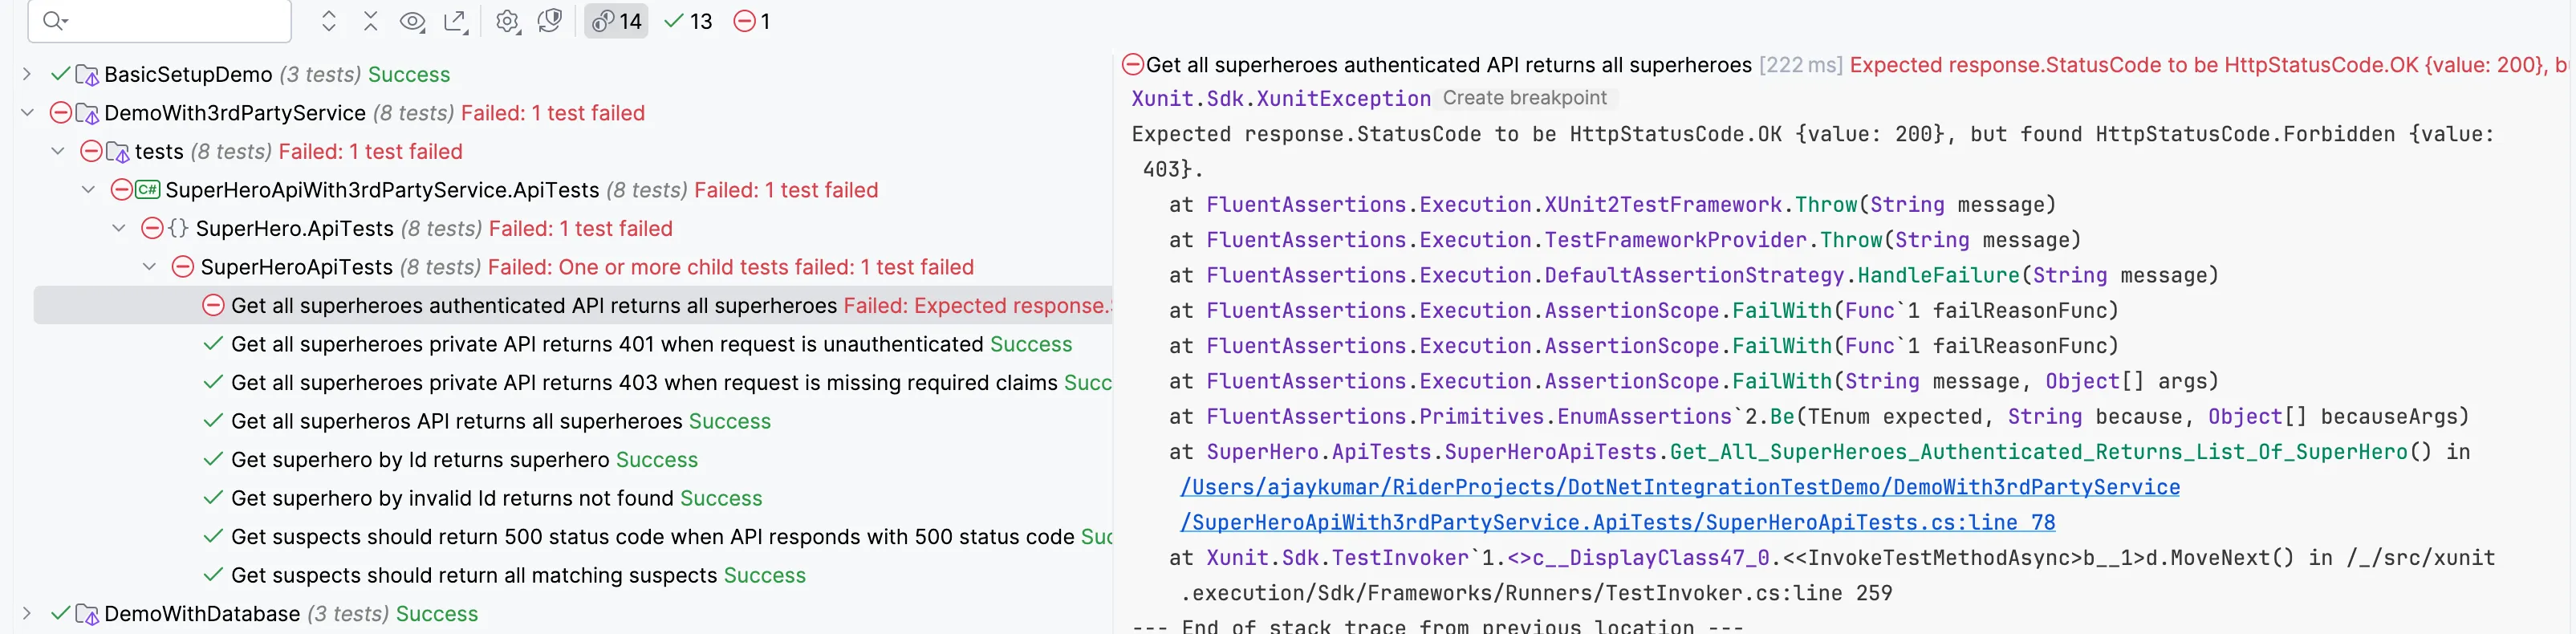
The test run above also failed with a 403 status code. Our authentication issue is resolved since we no longer receive a 401 error. However, we still get a 403 because the token contains the Anonymous role, while our API requires the Admin role, resulting in a forbidden error.
Let's fix our test by assigning the correct token with the Admin role when creating the HTTP client:
            // Replace
            using var httpClient = factory.CreateClientWithClaim(AuthClaimsProvider.WithAnonymousClaim());

            // With
            using var httpClient = factory.CreateClientWithClaim(AuthClaimsProvider.WithAdminClaim());
Code Sample #10 : Test with admin claimsNow, if we run the test after the above changes, our test succeeds with all assertions.

Thats about it for this article. Hope you liked it.
For reference, the code repository being discussed is available at github: https://github.com/ajaysskumar/SuperHeroSolution
Thanks for reading through. Please share feedback, if any, in comments or on my email ajay.a338@gmail.com