
Performance Testing for APIs: Spike testing with K6

🔦 Introduction
Picture this: a small community library's online reservation page is quiet all week, then a popular local author announces a surprise appearance. Within minutes, hundreds — then thousands — of visitors flood the site to reserve tickets. The system wasn’t built for this sudden surge and becomes unresponsive for the very people it was meant to serve.
Unlike stress tests which gradually push a system to and beyond its limits, spike tests focus on sudden, very-short-term surges in traffic. These are common in real-world scenarios like flash sales, viral social posts, breaking news, or a single influencer driving traffic. Spike testing answers the critical question: "How does my system behave when traffic jumps abruptly?" — and just as importantly, "How quickly does it recover?"
Primary Goals of Spike Testing
- Validate system behavior under sudden traffic surges
- Detect cascading failures caused by resource exhaustion
- Measure recovery time and data integrity after the spike
- Identify capacity bottlenecks that only appear under abrupt load
Why Spike Tests Matter (Real-World Lessons)
Many outages aren't caused by steady growth but by sudden spikes. Below are real-world incidents and the ways spike testing could have reduced their impact:
- Ticketing Site Overload (Hypothetical, inspired by common incidents): A concert promoter released tickets with a surprise drop. The site was fine under normal traffic but had synchronous locking and a database connection pool sized for routine load. When thousands of users hit 'buy' simultaneously, the pool exhausted, requests queued, and timeouts cascaded into sold-out errors and duplicate charges. A spike test would have revealed the connection pool and locking hotspots and allowed engineering to add queuing or optimistic concurrency.
- News Publisher Cache Stampede: A breaking headline went viral and cache keys expired simultaneously, causing a thundering herd of requests to backend services. The origin servers were overwhelmed. A spike test with cache expiry patterns would have shown this failure mode and encouraged implementing request coalescing, proactive cache warming, or longer TTLs for critical resources.
- E-commerce Flash Sale Failures: During a limited-time sale, shoppers experienced slow checkout and inventory mismatches because inventory writes couldn’t keep up with burst traffic, and fallback paths performed inconsistent updates. Spike testing would have revealed write contention and helped design idempotent purchase flows and stronger inventory reservation mechanisms.
- API Rate-Limiter Misconfiguration: A public API had generous per-minute quotas but strict per-second limits. When a partner system retried aggressively after brief failures, it triggered per-second throttles and a severe outage. Spike tests exposing per-second behavior would have surfaced the configuration mismatch.
When to Use Spike Testing
Spike testing is essential in scenarios where traffic can jump instantaneously. Use it when:
Common Scenarios
- Before marketing campaigns or feature launches that can create viral traffic
- When you expect short-lived, very high-concurrency patterns (flash sales, viral content)
- To validate auto-scaling and circuit-breaker behavior under abrupt load
- When investigating intermittent production outages that coincide with traffic bursts
Designing a Spike Test with k6
The key elements of a spike test are a small baseline, a rapid ramp to a high target for a short duration, and an immediate recovery period to observe system behavior. We'll use the sample k6 script in our repository as a concrete example.
The Spike Test Script (k6)
import http from 'k6/http';
import { check, sleep } from 'k6';
import { Rate } from 'k6/metrics';
import { htmlReport } from "https://raw.githubusercontent.com/benc-uk/k6-reporter/main/dist/bundle.js";
import { textSummary } from "https://jslib.k6.io/k6-summary/0.0.1/index.js";

// Custom metric to track failure rate (for our checks)
const failureRate = new Rate('check_failure_rate');

/*
  Spike test example:
  - Keep a small baseline of virtual users for a period
  - Suddenly spike to a very large number of users for a short time
  - Return quickly back to baseline and observe recovery

  This demonstrates how the system behaves under a sudden surge of traffic.
*/
export const options = {
  stages: [
    // Baseline warm-up
    { duration: '10s', target: 10 },     // Ramp up to 10 users
    { duration: '30s', target: 10 },      // Steady baseline for 30 seconds

    // Spike
    { duration: '5s', target: 500 },    // Rapid ramp up to 500 users (spike)
    { duration: '30s', target: 500 },     // Stay at spike load for 30 seconds

    // Recovery back to baseline
    { duration: '20s', target: 10 },     // Rapid ramp down to baseline
    { duration: '30s', target: 10 },      // Let the system recover at baseline

    // Cooldown to 0
    { duration: '30s', target: 0 },      // Ramp down to 0 users
  ],

  // Thresholds tuned for spike (we allow some degradation during spike but keep limits reasonable)
  thresholds: {
    'http_req_duration': [
      'p(95)<2000',  // 95% of requests should be below 2s
      'p(99)<5000',  // 99% of requests should be below 5s during a big spike
    ],
    'http_req_failed': ['rate<0.10'],      // Allow up to 10% failure rate during the spike
    'check_failure_rate': ['rate<0.10'],   // Same threshold for our custom check
  },
};

export default function () {
  // Target URL - adjust if your API runs on a different host/port
  const url = 'http://localhost:5127/mostborrowedbook';

  // Add a tag so metrics in k6 can be filtered/grouped by endpoint
  const response = http.get(url, { tags: { name: 'MostBorrowedBook' } });

  // Basic checks to validate correctness and a soft latency guard
  const checks = check(response, {
    'status is 200': (r) => r.status === 200,
    'response time < 2000ms': (r) => r.timings.duration < 2000,
    'valid response body': (r) => r.body && r.body.length > 0,
  });

  // Record custom metric for later assertions
  failureRate.add(!checks);

  // Helpful debug log when things fail — keep minimal to avoid log spam during large spikes
  if (!checks) {
    console.log(`Check failed. status=${response.status} duration=${response.timings.duration}`);
  }

  // Short randomized sleep to avoid perfectly synchronized requests
  sleep(Math.random() * 1 + 0.5); // 0.5 - 1.5s
}

// Produce an HTML report plus a console summary when the test finishes
export function handleSummary(data) {
  return {
    "spike-test-results.html": htmlReport(data),
    stdout: textSummary(data, { indent: ' ', enableColors: true }),
  };
}
Key Components Explained
Important parts to note:
- Baseline: Keeps a small steady load so the system isn't entirely cold when the spike begins.
- Rapid Ramp (Spike): A 5–10 second ramp to a very high VU count simulates real-world sudden surges.
- Hold Duration: The spike is short (tens of seconds). This shows systems that survive short bursts versus those that collapse under brief pressure.
- Recovery Observation: The immediate ramp-down and subsequent baseline period reveal whether the system recovers gracefully or remains degraded.
- Checks & Custom Metrics: Functional checks (status, response body) and a `check_failure_rate` metric help correlate functional correctness with performance metrics.
How to Run and Interpret Results
Run the spike test from the `api-performance-testing` directory:
k6 run k6-spike-test-demo.js
After completion, inspect `spike-test-results.html` for a visual breakdown. Key signals to look for:
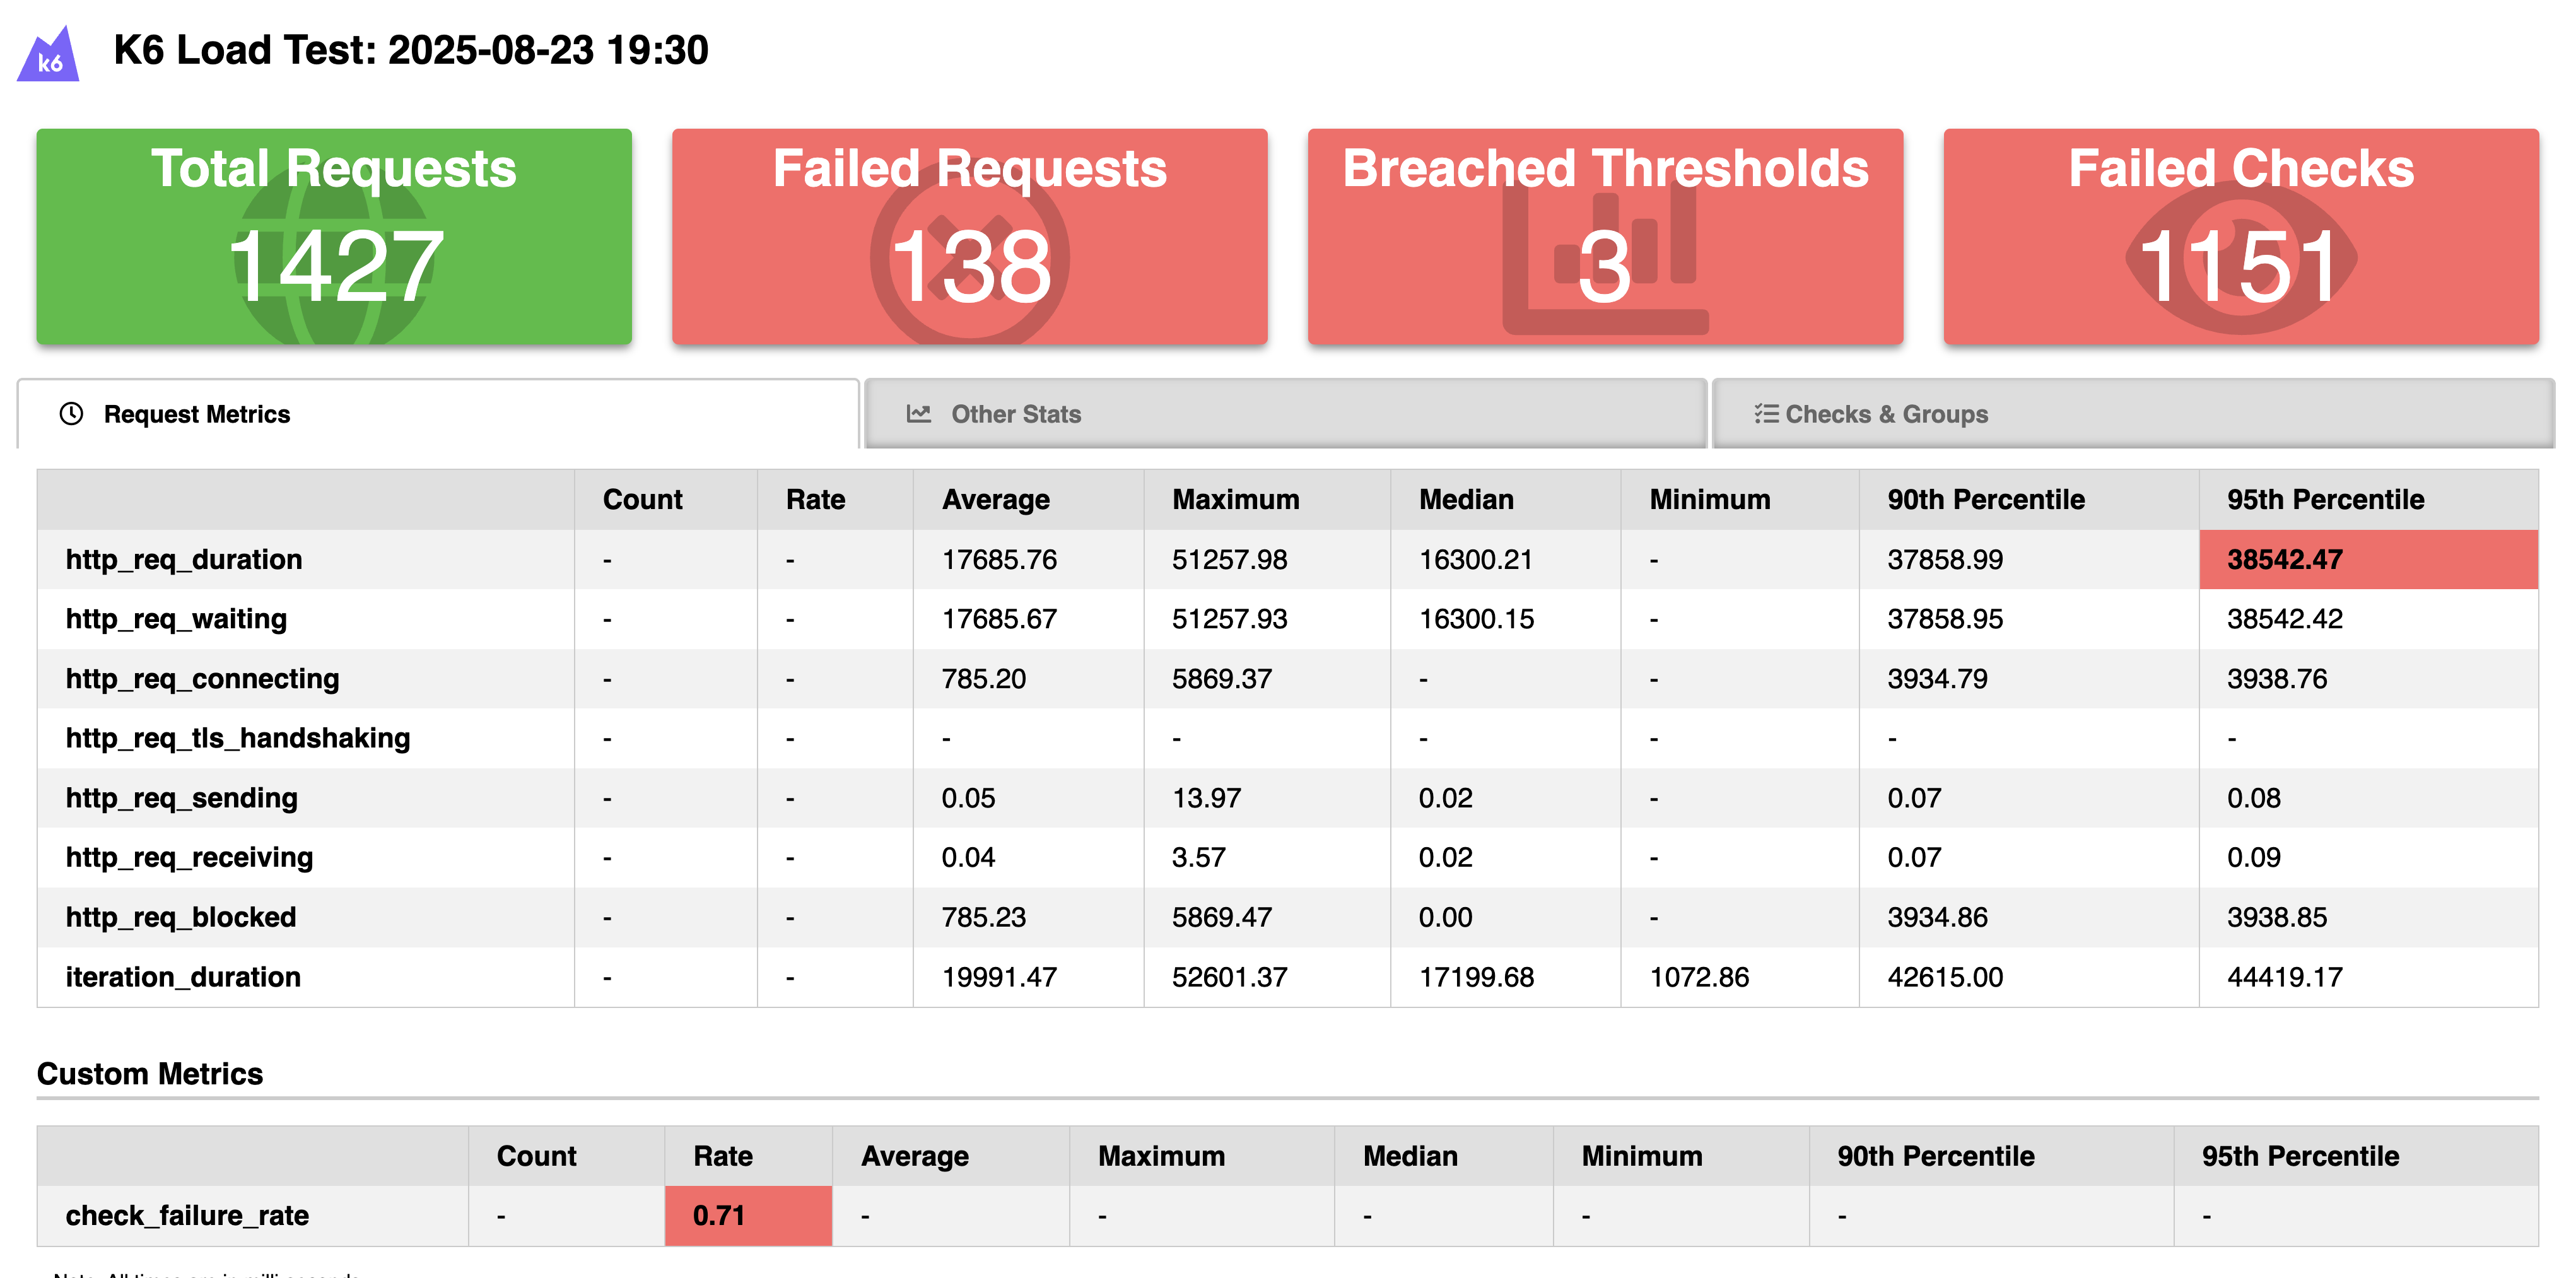
- Latency spikes: Large p95/p99 spikes during the ramp indicate resource saturation or queuing.
- Error patterns: Sudden rises in `http_req_failed` point to throttling, exhausted connection pools, or upstream timeouts.
- Recovery curve: How long does p95 take to return to baseline? Long recovery can indicate background tasks or caches rebuilding.
- Functional failures: `check_failure_rate` shows correctness regressions — e.g., incomplete responses or incorrect data during the spike.
Mitigations and Practical Fixes
If a spike test reveals problems, here are practical mitigations to consider:
- Connection Pooling & Backpressure: Increase pool sizes where appropriate and implement backpressure/queueing to smooth sudden bursts to downstream services.
- Resiliency Patterns: Circuit breakers, retries with jitter, and bulkheads prevent cascading failures during spikes.
- Cache Strategy: Use cache warming, request coalescing, and staggered expirations to avoid a stampede on cache misses.
- Idempotency & Rate Limits: Make key operations idempotent and ensure rate-limit rules match real traffic patterns (per-second vs per-minute boundaries).
- Autoscaling Tuning: Ensure autoscaling reacts fast enough for expected spike durations or adopt pre-warming strategies when spikes are predictable.
Summary and Next Steps
Spike tests target a specific, high-risk scenario: abrupt traffic surges. They reveal different failure modes than gradual stress tests — namely race conditions, cache stampedes, connection pool exhaustion, and misconfigured rate-limits. By rehearsing these scenarios in a controlled environment, teams can harden systems and design better fallback behavior.
Next steps:
- Run the provided `k6` spike script against a staging environment that mirrors production.
- Iterate on infrastructure fixes, then re-run to verify improvements.
- Automate periodic spike tests for critical endpoints ahead of known events (drops, launches).
Resources
- k6 Documentation
- Repository: ajaysskumar/API-Performance-Testing (contains `k6-spike-test-demo.js`)